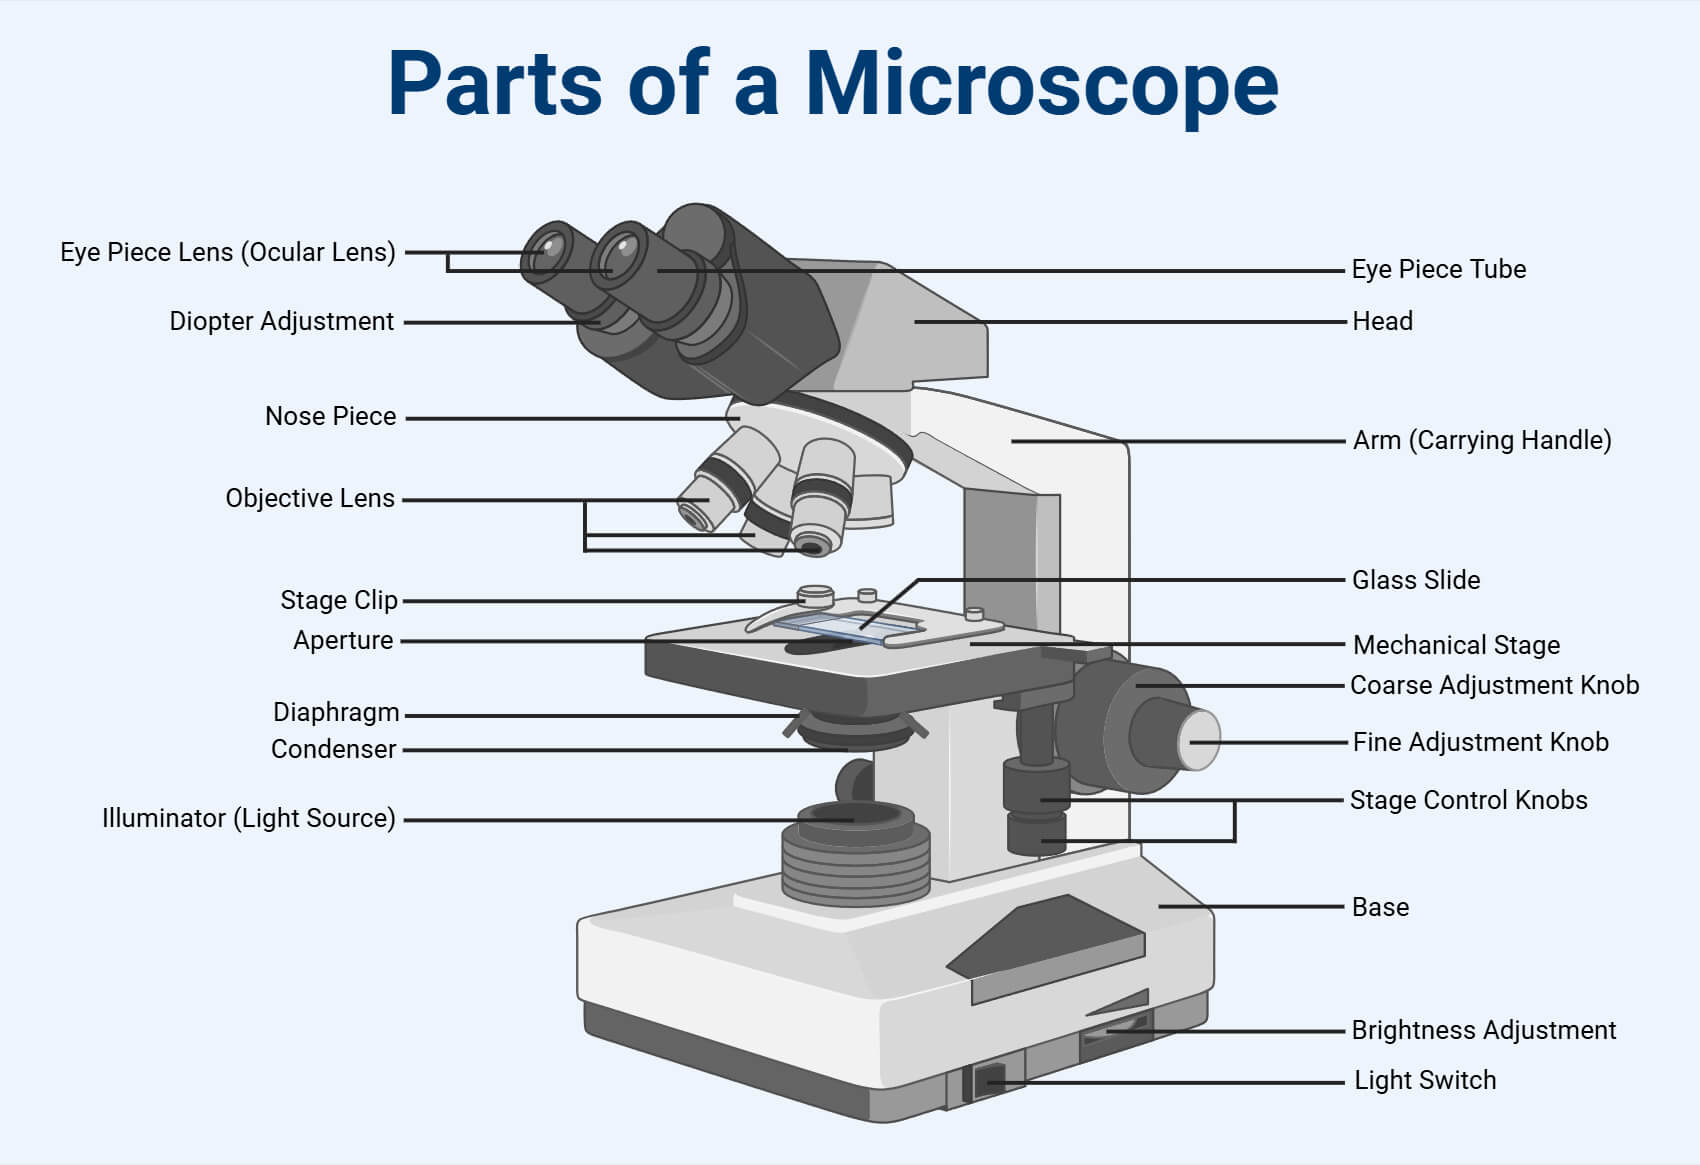
The labelling of microscope is a highly useful printable resource, worksheet, template, or guide that provides a detailed diagram of a microscope's various components, allowing users to identify and label each part. This resource is commonly used in educational settings, such as biology and science classrooms, where students are introduced to microscopes as a fundamental tool for scientific exploration. For instance, in a typical laboratory setting, students are often required to familiarize themselves with the different parts of a microscope, including the eyepiece, objective lenses, stage, and focus knobs, to conduct experiments and observations. The labelling of microscope resource serves as a valuable aid in this process, enabling students to accurately identify and understand the functions of each component.
The core purpose of the labelling of microscope resource is to facilitate a comprehensive understanding of microscope anatomy, which is essential for effective microscope operation and maintenance. Having a structured or printable version of this resource is highly convenient and effective, as it allows users to easily reference and review the different parts of a microscope. This, in turn, enhances their ability to assemble, disassemble, and troubleshoot microscopes, as well as optimize their performance for various scientific applications. The benefits of using a labelling of microscope resource include improved knowledge retention, increased confidence in microscope operation, and enhanced laboratory productivity.
Below, detailed usage guides, FAQs, and actionable tips are provided to help maximize the potential of the labelling of microscope resource. These sections will cover topics such as how to effectively use the resource in classroom settings, tips for creating custom labelling exercises, and strategies for integrating the resource into broader scientific curricula. By exploring these sections, educators, students, and enthusiasts can unlock the full potential of the labelling of microscope resource, ultimately leading to a deeper understanding and appreciation of microscopy and its applications in various scientific fields.
Frequently Asked Questions
This FAQ section covers the most common questions about downloading, printing, and using the "labelling of microscope" resource, providing helpful guidance on how to effectively utilize this template for educational or organizational purposes.
Question 1: How can the "labelling of microscope" resource or template be downloaded or printed?
The "labelling of microscope" resource can be downloaded in PDF format from the official website or online repository. To print, simply open the downloaded file, select the desired printer, and choose the appropriate paper size, usually A4 or letter size. Ensure the printer is set to print in high-quality mode for clear and crisp labels.
Question 2: Can this template or worksheet be customized or edited digitally?
Yes, the "labelling of microscope" template can be customized or edited digitally using PDF editors or software such as Adobe Acrobat. Users can modify the layout, fields, or contents of the resource to suit specific needs, including adding or removing labels, changing font sizes, or adjusting the diagram of the microscope.
Question 3: What is the best way to utilize this worksheet or template for educational or organizational purposes?
The "labelling of microscope" resource is ideal for educational settings, such as biology or science classes, where students can practice identifying and labeling different parts of a microscope. For organizational purposes, professionals in laboratories or research institutions can use this template to create standardized labels for microscopes, ensuring consistency and efficiency in their work.
Question 4: What are the recommended printing settings or paper sizes for this resource?
For optimal results, it is recommended to print the "labelling of microscope" resource on A4 or letter-sized paper, using a high-quality printer setting. Choose a clear and legible font, and consider printing in color to distinguish between different parts of the microscope. Avoid using low-quality paper or printers, as this may compromise the clarity of the labels.
Question 5: Are there common mistakes to avoid when filling out or using this resource?
Common mistakes to avoid include incorrect labeling of microscope parts, inconsistent formatting, or incomplete information. To avoid these errors, carefully review the template or worksheet before filling it out, and ensure that all labels are accurately completed. Double-check the work for spelling or grammatical errors, and consider having a peer or supervisor review the completed resource.
Question 6: Where can additional answers or solutions related to "labelling of microscope" be found?
Additional answers or solutions related to "labelling of microscope" can be found on online forums, educational websites, or scientific communities. The official website or repository where the resource was downloaded may also provide supplementary materials, such as user guides, tutorials, or FAQs. For more specific or technical questions, consider consulting with a biology or science expert, or seeking guidance from a professional organization.
A key takeaway from this FAQ section is that the "labelling of microscope" resource is a versatile and customizable tool that can be effectively utilized for educational or organizational purposes. By following the guidelines and tips outlined above, users can ensure that they are getting the most out of this resource.
For more tips on how to use the "labelling of microscope" resource, including ideas for interactive lessons and activities, please refer to the tips section below.
Practical Tips and Best Practices
Effective use of the "labelling of microscope" worksheet or template can significantly enhance learning and productivity. These actionable tips will help maximize the potential of this valuable resource, ensuring it remains a reliable and efficient tool for educational and professional purposes.
Tip 1: Opt for Lamination to Create a Reusable Surface
Laminating the printed worksheet or chart allows the use of dry-erase markers, making the resource reusable and eco-friendly. This simple step extends the lifespan of the template, reducing the need for frequent reprints and minimizing waste.
Tip 2: Implement a Color-Coding System for Better Organization
Using different colored highlighters, pens, or folders helps categorize different sections of the template or schedule for quick visual scanning. This organizational hack enables users to prioritize tasks, identify key components, and navigate the resource with ease.
Tip 3: Adjust Print Scaling Settings to Avoid Cutoffs
Selecting "Fit to Page" or "Scale to Fit" in print settings ensures the entire template fits perfectly on standard Letter or A4 paper. This technical adjustment prevents cutoffs and distortions, guaranteeing a clear and legible printout.
Tip 4: Organize Resources in a Dedicated Planner or Binder
Punching holes in the printed sheets and organizing them chronologically or by category in a 3-ring binder provides easy reference and minimizes clutter. This systematic approach keeps all relevant materials in one place, streamlining workflow and reducing stress.
Tip 5: Utilize Digital PDF Annotation Tools for Paperless Use
Importing the PDF template into annotation apps on tablets allows users to write directly on the screen, facilitating a paperless workflow. This digital approach offers increased flexibility, enabling users to access and interact with the resource from anywhere, at any time.
By applying these simple yet effective strategies, the efficiency and durability of the "labelling of microscope" resource are significantly enhanced. A well-organized and carefully maintained template or worksheet becomes an indispensable tool, providing a solid foundation for learning, research, and professional development.
With these practical tips and best practices, users can unlock the full potential of their "labelling of microscope" resource, ensuring a seamless and productive experience that yields lasting results and fosters continued growth and success.
Conclusion
The utilization of a well-structured "labelling of microscope" resource, template, or worksheet significantly simplifies tasks, improves learning, and boosts organization. By providing a clear and concise format for identifying and labeling the various components of a microscope, these resources enable individuals to quickly and accurately complete assignments, studies, and experiments. This, in turn, leads to enhanced understanding, reduced errors, and increased productivity, making them an invaluable tool for educational and professional settings.
Taking the time to download, print, or set up a "labelling of microscope" resource is a highly rewarding step toward achieving productivity, clarity, and educational success. The long-term value, convenience, and efficiency gains derived from using these structured templates or worksheets far outweigh the initial investment of time and effort, ultimately leading to improved outcomes and a stronger foundation in microscopy and related fields.
Additional context and verified research data can be verified on Wikipedia's Public Archives.